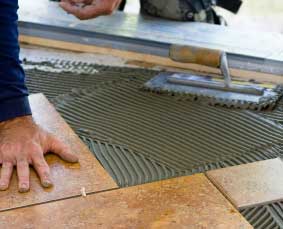
Ceramic floor tiles can really add appeal to a room. But as well as aesthetic value, ceramic tiles also have the added bonus of being hardwearing, easy to clean, and cool in the summer. Laying them is not too much of a job, but preparation is key (as always).
Preparing and Marking a Floor for Tiling
To achieve the best finish, the sub-floor (the surface the tiles will be laid on to) needs to be clean, dry, and level. If the sub-floor is uneven, use a thin layer of self-levelling screed and allow this to dry thoroughly before laying any tiles. When the sub-floor is ready, you can start to mark out. Measure to the centre of each wall (assuming the room is a regular shape) and mark from wall to wall to “quarter” the room. The best way to do this is to use a chalked string stretched tightly between the two points and then flicked to leave a chalk line on the floor.
Dry Layout of Floor Tiles
Once your room is marked into quarters, dry lay the tiles (lay them out as you want them but without adhesive). This allows you to see how the tiles will fit and allow you to adjust the centre slightly if needed. Try to adjust the spacing so that the border tiles are as wide and as equal as possible.
With the tiles laid out (remembering the spacers for the grout) nail a batten in line with the last full tile row along two adjacent walls. These will give you a fixed edge to work from.
Laying Ceramic Tiles Onto the Adhesive
For laying ceramic floor tiles, you should use a waterproof, flexible adhesive. Following the manufacturer’s instructions and using the correct spreading tool (notched or plain blade) start to spread enough adhesive for about 5 tiles. If you spread any more than this at a time, it will start to dry before you have a chance to lay tiles on it.

Start at the angle created by your two battens and lay a square of four tiles. Check they are aligned with a straight edge before continuing.
Once you have covered half of the room, recheck all the edges and levels, etc, before continuing on to the other half of the room.
Laying the Border Tiles
Border tiles are the tiles that edge the room. These are the tiles you should plan to cut, rather than the “field” tiles in the middle of the room. If you have a reasonably even room and have followed our advice thus far, your border tiles should all be roughly the same size.
Lay a full tile over the last tile before the border and slide it up against the wall. Take into account the 2mm grout gap and then mark the tile with a felt tip pen. With a tape measure, check the border gap for the rest of that particular wall and if it is even, you can use the first tile as a template. This way you can work out how many you need to cut for a full row, and using a tile cutter (floor tiles are hard to cut by other means), cut enough to fit.
Repeat this for all the borders. Any uneven or angled walls will need to have border tiles cut individually to fit.
Grouting and Finishing Ceramic Floor Tiles
Once the tile adhesive has been allowed to set for the recommended amount of time, you are ready to grout. Using ready-made grout in whichever colour you have chosen (usually available in white, grey or brown), start to fill the gaps between the tiles with a plastic, flexible scraper.
Make sure the gaps are filled with grout and keep them flush with the edge of the tiles to avoid creating hollows in which dirt may be trapped. Wipe off any excess grout from the face of the tiles as you go, and then, once the whole floor is finished and the grout dry, you can polish off any remaining residue with a dry cloth.


