Because the Grout between tiles is porous, over time it will inevitably become ingrained with dirt. Tiles, due to their hard-wearing design, are usually used in areas that get damp, dirty and greasy such as kitchens and bathrooms. Even with the most diligent cleaning routine, the grout between the tiles will discolour and start to look grubby over time.
If the tiles are in good condition, re-grouting a tiled wall or floor will instantly make the whole area look newer, cleaner and more appealing, and is a cheap way to make a grubby bathroom look nicer.
Removing Stained Tile Grout
You might need to remove a localised area of grout if, for example, you want to replace a cracked or broken tile. You can remove broken tiles from within a field of tiles without removing the grout first, but by removing the grout you reduce the chance of damaging the surrounding tiles during the process.
Protecting the Surrounding Tiles
Before trying to remove grout, for whatever reason, you can first protect the surrounding tiles. To do this, mask off the surrounding tiles with decorating masking tape. This is probably not realistic if you are re-grouting an entire bathroom, but if you are only doing a small area masking off the tiles is a good idea.
How to Remove a Layer of Grout
If your aim is to simply re-grout the tiled wall, you don’t actually have to remove all of the grout between the tiles, only the top 3mm. This will give you enough of a valley to apply fresh grout over the top.

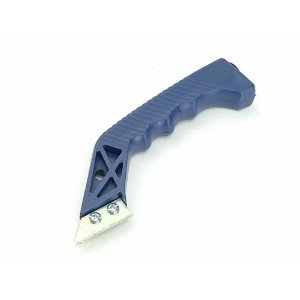
To remove the top layer of grout only, buy a small and cheap tool called a Grout Rake. This simple hand tool consists of a handle and a small, toothed blade. All you need to do is slowly but firmly draw the blade of the rake along the lines of grout until you have removed the dirty surface grout down to a depth of 3mm. When all the grout has been treated in this way, you can apply new grout over the top.
How to Remove All Grout Between Tiles
If you need to completely remove the grout around a tile or tiles, you can use a grout rake to remove most of it. You might, however, need to use a grout saw. As with a grout rake, grout saws are cheap to buy and certainly worth having in your tool kit.
With the surrounding tiles masked off, draw the rake or saw along the line of grout with a firm, even pressure. You will need to repeat this several times before you break or cut through the grout. Once you cut through the grout to a certain point, it should start to break away from the surrounding tiles and can be brushed out of the joint.
Removing Floor Tile Grout
The grout used between floor tiles is usually stronger and more resilient than wall tile grout, often being mixed with sand. You might find that you need to use a small cold chisel to break out the floor grout once it has been weakened with a grout rake.
Our guide to Perfect Grouting will help you to replace any grout you have removed.
How to Use Grout Whitener
An alternative to removing and replacing stained grout is to use a grout whitener. These products are widely available (although some are better than others) and are usually very easy to apply. The best grout whiteners are in a thick paste or liquid form and are simply painted over the old grout to stain it white.
If you plan to use a grout whitener, make sure that the old grout is as clean and dry as possible before you apply it. If there is any soap residue or loose dirt on the grout, the whitener may simply flake off when dry.


