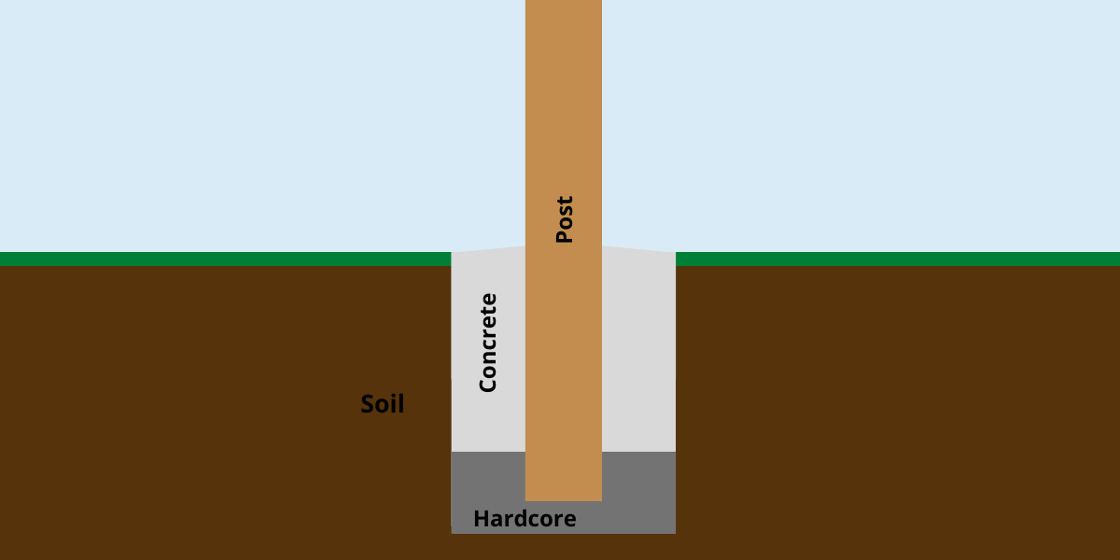
Setting Timber Posts in Concrete. Whether you are putting up a fence or building a raised deck, being able to securely set wooden posts into concrete foundations is a useful skill to have. Although this task might seem simple, getting it right is harder than many people think. And as the post is the thing that gives strength to the structure, being able to set it firmly is essential.
When buying or cutting posts that will be sunk into the ground, make sure to allow for the part of the post that will be buried. For example, if you need the post to project 2m out of the hole, you need to cut it 2.6m long (600mm underground).
All exterior wood should be pressure treated before sale to help prevent rot. This is particularly important for timber that will be sunk into the ground. It is also a good idea to paint a coat of wood preservative onto the section that will be underground, even if you don’t plan to treat the rest of the post.
Step 1 – Digging the Post Holes
If you are using bags of Post-Mix, exact instructions for the size and depth of the post holes will usually be included on the packaging. As a general rule, if the ground around the hole is made up of disturbed soil, the hole should be 600mm deep and roughly three times as wide as the post.
When digging the holes for fence posts or decking posts, it is a good idea to set a string line so that the holes are all in line. Measure and mark their positions first, and then dig out all of the holes.
Step 2 – Securing the Fence Posts
Pack the bottom 50mm of the hole with hardcore made of broken brick or stone. Place the post into the middle of the hole and pack more hardcore around the bottom of it until half the hole is filled. Pack the hardcore down firmly and make sure the post is upright at this point.
Get over 16000 woodworking plans. Learn how to build anything from furniture to birdhouses out of wood. Clear and detailed plans that guide you through the process of each project step-by-step.
Step 3 – Adding the Concrete to the Post Holes
If you are using post-mix, read and follow the manufacturer’s instructions. The exact method of adding post-mix can vary from adding the mix dry and then pouring in water, to pouring in the water first and then adding the mix. If you are making your own concrete mix, go for a 3:2:1 mix (3 aggregate, 2 sand, and 1 cement). Tamp the concrete down firmly, filling the hole slightly above the surface of the ground. The concrete will start to go off quickly, so you need to work quite fast.

Step 4 – Propping the Post
Check the post is still upright and use spare lengths of wood to prop it in place. When you are happy that it is upright and firmly propped up, tamp the concrete again to make sure there is no gap around the post. Smooth off the surface of the concrete, sloping it slightly away from the timber so that water is shed away from it.
Step 5 – Finishing Off
You can now move on to the next hole and repeat the process. If you are using the posts for pre-made fencing panels, it is worth double-checking the measurements between the posts before adding the concrete to the remaining holes. A quick check before adding the concrete will save a lot of time later if the fence panel won’t fit between the posts.
Choosing the Best Fence Posts for Concrete
When choosing the timber posts you are going to use for your fence or deck project, remember that not all fence posts are the same. The best fence posts to use with a concrete foundation are hardwood posts. Hardwood posts may be more difficult to find, and more expensive, than less durable wood.
If your budget doesn’t allow for hardwood fence posts to be used, choosing treated softwood posts is the bare minimum you should consider. Posts that have been pressure-treated are best, but even those that have been dipped or sprayed with preservatives are better than untreated timber posts. Even hardwood posts should be treated if you want them to last with a minimum of maintenance.
Always check the cut end of the fence post, as sometimes this can be left untreated after it is cut in the factory. And of course, if you trim a post to a required height, make sure you paint the end with a good wood preservative.
Mix Your Own Concrete or Use Post-Mix?
If you have to fill a lot of fence post holes with concrete, it can be more economical to mix it yourself. The best concrete mix for timber fence post holes is, as mentioned earlier, a 3:2:1 mix (3 parts aggregate, 2 parts sand, and 1 part cement). Mixing concrete isn’t difficult, but it can sometimes be tricky to judge exactly how much you need, and when you need it. Because of this, many people prefer to buy post-mix bags.
Post-mix, sometimes called Postcrete, is the dry ingredients of concrete ready-mixed in a bag. All you need to do is tip the mix into the hole and then add water to start the setting process. Post-mix usually contains a 3:2:1 mix, but may also include quick-setting agents or even preservatives to help stop the timber from rotting.
You can even buy post-mix that uses lightweight aggregate to make it easier to carry and tip the bags into the holes.


