Adding a Concrete driveway to your property makes very good sense and if you have the room, this is a summer project you should really consider. Building a Driveway is a good idea for several reasons, not least the added security they offer for your car.
Insurance is often cheaper if the car is parked off the road at night, and it makes loading and unloading your car so much easier than trying to do it on the road. Having offroad parking can, in certain situations, add considerable value to your property.
Planning a Concrete Driveway
There are several different ways to create a drive, from simple gravel to impressive block paving. The type of drive you create is up to you, but there are several things you need to consider for any domestic driveway.
1. Driveway Width – A domestic driveway should be at least 3m wide. This allows for the average car and gives enough room on either side for passengers to get out. If you own a larger vehicle you should, of course, consider making it slightly wider.
2. Driveway Location – You need to think about ease of access, as well as anything which might obstruct your view as you leave the drive. Will you need to remove a section of wall or hedge to allow access to the driveway? Is there a drain or sewer cover you’ll need access to?
3. Getting the Kerb Lowered – You will need to apply to your local council to have the kerb dropped outside of your new drive. You cannot simply bump up over the standard kerb and footpath (in the UK anyway). There are several things that might negatively impact your application for a dropped kerb, including the type of road you live on and the type of building you live it (is it listed or anything other than a single dwelling?). If your application for a dropped kerb is successful, the council will usually do the work and then charge you. Make sure you include this cost in your budget for the work.
4. Driveway Planning Permission (UK) – Driveways built at the front of your property now sometimes require planning consent. Drives constructed with concrete or another non-porous material, which are larger than 5 square metres, will require planning permission. Driveways made from porous materials (gravel, porous asphalt, paving slabs, etc) do not. Any driveway under 5 square metres in size, made of any material, will not require permission. As always, if in doubt, speak to your local planning office.
How to Build a Concrete Driveway
Concrete driveways are a good option if you want an easy to lay, hard-wearing surface which is relatively cheap to create. The slight downside is that concrete is not the most attractive finish and you will have to wait about 10 days before you are able to park a vehicle on it.
Marking and Setting Out
Mark out the position of the drive with pegs and string, ensuring that it is wide enough for your vehicle, and then start to excavate the soil between the string. You should plan to excavate around 200mm of soil to allow for both the sub-base and the concrete layer (100mm for each). Level the bottom of the excavated area by scraping a board along the length of it and then packing down the earth.

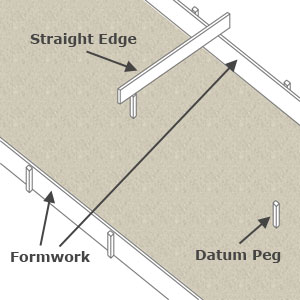
Drive a peg into the ground in the middle of one end of the driveway, keeping the top of it at the height you want the surface of the concrete. Move 2m along the driveway and hammer a second peg into the ground, using a straightedge and spirit level to keep the top level with the first peg.
Continue to do this along the full length of the driveway. The pegs, called datum pegs, will help you to keep the formwork level and even along its length. Driveways should have a very slight slope on them to allow water to drain off (which helps to protect the concrete and stops ice from forming too thickly in cold weather). Take this into consideration if creating a driveway on a very flat section of ground.
Building Formwork for the Driveway
Formwork is essential for getting a good finish on your concrete driveway. Properly laid formwork will help to give the concrete pad clean edges and also helps you to create smooth curves and corners if you need them. More importantly, it acts as a guide when you are levelling the surface.
Using planks at least 25mm thick, start to peg out the planks along the edge of your driveway excavation. As you fix each plank by driving pegs in along the outside edge, check that the formwork is level using a straightedge and spirit level laid on to the nearest datum peg. The top edge of the formwork needs to be level as you will use this later as a guide for levelling the wet concrete.
If your planned driveway is very long, it is worth thinking about hiring metal Roadforms. Buying the quantity of timber you will need for a long drive can be expensive, so hiring formwork might make better financial sense. Metal Roadforms are available both as rigid straight sections and flexible sections for forming corners. If you are using wood for the formwork, you can create curved corners by making a series of cuts partway through the back face of the board. This should allow you to bend the board without snapping it.
Creating Control Joints
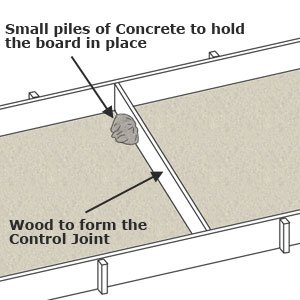
If your driveway is going to be longer than 4 metres, you will need to include control joints in its construction. Control joints allow the concrete slab to settle and shift slightly without cracking.

Cut some lengths of 12mm thick rot-treated timber that is the same height as the formwork and insert them at 4 metre intervals along the driveway excavation. Fix them to the sides of the formwork with nails and support them along their length with small mounds of concrete before you start to pour.
You should also create a control joint between the driveway and a wall. You can use thick strips of bituminous felt held in place by small mounds of concrete to do this.
Laying a Hardcore Base for the Driveway
You will need to lay down a sub-base of hardcore to give the concrete a solid footing. The hardcore sub-base should ideally consist of crushed stones and sand, but you can use general builder’s rubble as long as it is fairly well crushed and you remove any metal, plaster, etc.
For a standard driveway, your sub-base should be at least 100mm deep (the same depth as the concrete), rising to 150mm if you plan to park larger vehicles on it. The hardcore sub-base needs to be in place and compacted before any ready-mix concrete arrives.
Pouring the Concrete
For large driveways, you should certainly consider using ready-mix concrete which can be delivered by lorry. There are now several companies across the country that are happy to deliver fairly small amounts of ready-mix.
A driveway that will be 6 metres long by 3 metres wide and 100mm thick will require roughly 2 cu. m. of concrete. The position of most driveways will allow for the concrete to be poured straight from the lorry, but if you think you will need to use wheelbarrows to get the concrete to the site, remember that each cubic metre of concrete will fill around 25 wheelbarrows and concrete will only stay workable for about an hour and a half.
You can read more about using Ready-Mix Concrete in our Ready-Mix Guide.
If you plan to mix the concrete yourself (and you should think carefully about that), you will need a cement mixer and a second pair of hands to help out. That way, one person can be mixing a fresh load whilst the other is wheeling the concrete to the driveway site.
Even with two people, you will almost certainly want to split a long driveway into bays by adding formwork across the width at 2m intervals and fill one bay at a time. This method also does away with the need to add control joints, as the butt joints between bays will allow for movement and expansion.
Finishing The Concrete Surface
Level the wet concrete by scraping a length of timber across the surface, using the formwork as a guide. If your formwork is nice and level, this should provide you with a good surface finish. Sawing the length of timber back and forth across the surface as you level it will help to give the driveway some grip. There are several ways to finish the surface of concrete, but remember that it cannot be completely flat.

You should cover the concrete with polythene and leave it to dry out over the next 10-12 days. The polythene sheet will stop the concrete from losing moisture too quickly, which can lead to cracking and problems with the surface. Once the concrete is dry, you can carefully remove the formwork and infill the gap with soil.


Thanks for this very well written article. The drawings are especially useful for those that don’t have much experience or expertise in this field.
Thank you for the well written instruction. Have you any tips on laying the polythene over the fresh concrete without it marking the surface please?